The purpose of this article is to explain how to use the attachment control in PowerApps to allow a user to attach a file before sending an email.
First of all thanks to @WonderLaura for her article that helps me in my solution. And here is the documentation about the attachment control
In PowerApps the Attachment control works by linking a SharePoint list (Or CDS) to a form. Thanks to PowerApps, when the file is chosen by the user, it’s content is saved inside a blob as well as it’s name. There is no need to save the form for that, this action is only needed when you want to save the file to SharePoint.
So we are going to use this feature to allow the user to chose a file and send it as mail attachment but without the need to save it to SharePoint first. The SharePoint list used here is only used to “connect” the form to something that can eventually host attachment. So it’s a bit like a ghost list 🙂
The result of my empty/ugly app that select an attachment from local computer and send it via email

In order to do that, start by creating a new empty App in PowerApps.
The dataSource
- A SharePoint List named: MyFirstList with nothing more than the title. Attachment is enabled for this list
- The list is empty
The reload button at the top (Optional)
- OnSelect:
// refresh my datasource (Optional)
Refresh(MyFirstList);;
// Clear a local collection and collect the attachments of the first item of my list (Optional)
ClearCollect(colAttachments; First(MyFirstList).'{Attachments}’)
The form (Required)

- Add a new Edit Form
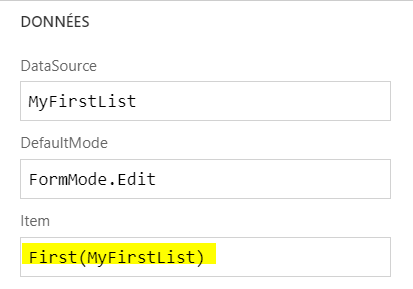
- Choose MyFirstList as datasource
- Select the Attachment Field
- Important step: Change the Item property of the form for this value: First(MyFirstList)
- The Pièces jointes_DataCard2 properties (Unlock if necessary)

- The DataCardValue8 properties (Unlock if necessary)
- OnAddFile:
//Refresh the local collection with the data of the control
ClearCollect(colAttachments; DataCardValue8.Attachments) - OnRemoveFile:
//Refresh the local collection with the data of the control
ClearCollect(colAttachments; DataCardValue8.Attachments)
- OnAddFile:
NB: Yes, it’s the same formula.

At this point, when you launch the App, the Attachment control should be enabled and you should be able to select a file from your disk. The data of the file will be saved in the local collection. Here is an example:

The Button to send the email (required)
The button uses the Office365 connector with the SendEmail action.
For the attachment, it uses a Table with specific columns:
Name, ContentBytes, ‘@odata.type’.
That’s what we are going to create when the user click the button.
NB: I’ve not been able to send multiple attachments yet, so for now I just send the first or last item or the collection. The error when the attachment table contains multiple items: The managed blob uri is not owned by the current app’s BlobManager
Not yet figured it out…
- OnSelect:
//Create a new Table
ClearCollect(FinalAttachments; {Name:Last(colAttachments).DisplayName; ContentBytes:Last(colAttachments).Value;’@odata.type’:””});;
// Send the email
Office365.SendEmail(“me@me.com”; “My Subject”; “My Body”; {Attachments:FinalAttachments})
That’s it, when the user click the button, it will create a new Collection with the 3 specific columns required for the Attachment and send it.


