In a project I’m working on, we had a Flow that updated a SharePoint list with data from an Azure Table Storage.
At first I created the flow to be triggered recursively every 1h, but after a while we wanted to give the possibility to execute it manually (From a PowerApp or a mobile button).
Duplicate the flow was not an option, so we had to change the trigger to allow multiple ways to execute the same Flow.
To do that, we changed the initial trigger from Recursive to HTTP Request. Then We created 3 other flows, with different triggers, each followed by an HTTP Action calling a POST request to the first flow.
Finally we had 4 flows that triggers the same logic:
1 flow containing all our logic triggered by an HTTP Request
1 flow with a recursive trigger, calling the 1st one
1 flow with a manual trigger, calling the 1st one
1 flow with a PowerApp trigger, calling the 1st one
The purpose of this article is to explain how to use the attachment control in PowerApps to allow a user to attach a file before sending an email.
First of all thanks to @WonderLaura for her article that helps me in my solution. And here is the documentation about the attachment control
In PowerApps the Attachment control works by linking a SharePoint list (Or CDS) to a form. Thanks to PowerApps, when the file is chosen by the user, it’s content is saved inside a blob as well as it’s name. There is no need to save the form for that, this action is only needed when you want to save the file to SharePoint.
So we are going to use this feature to allow the user to chose a file and send it as mail attachment but without the need to save it to SharePoint first. The SharePoint list used here is only used to “connect” the form to something that can eventually host attachment. So it’s a bit like a ghost list 🙂
The result of my empty/ugly app that select an attachment from local computer and send it via email
In order to do that, start by creating a new empty App in PowerApps.
The dataSource
A SharePoint List named: MyFirstList with nothing more than the title. Attachment is enabled for this list
The list is empty
The reload button at the top (Optional)
OnSelect:
// refresh my datasource (Optional)
Refresh(MyFirstList);;
// Clear a local collection and collect the attachments of the first item of my list (Optional)
ClearCollect(colAttachments; First(MyFirstList).'{Attachments}’)
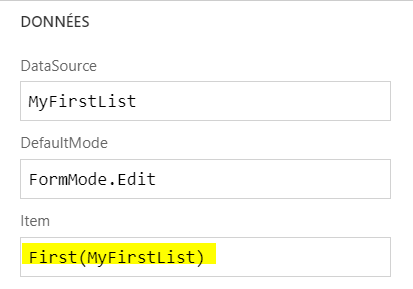
The form (Required)
Add a new Edit Form
Choose MyFirstList as datasource
Select the Attachment Field
Important step: Change the Item property of the form for this value: First(MyFirstList)
The Pièces jointes_DataCard2 properties (Unlock if necessary)
The DataCardValue8 properties (Unlock if necessary)
OnAddFile:
//Refresh the local collection with the data of the control
ClearCollect(colAttachments; DataCardValue8.Attachments)
OnRemoveFile:
//Refresh the local collection with the data of the control
ClearCollect(colAttachments; DataCardValue8.Attachments)
NB: Yes, it’s the same formula.
At this point, when you launch the App, the Attachment control should be enabled and you should be able to select a file from your disk. The data of the file will be saved in the local collection. Here is an example:
The Button to send the email (required)
The button uses the Office365 connector with the SendEmail action.
For the attachment, it uses a Table with specific columns:
Name, ContentBytes, ‘@odata.type’.
That’s what we are going to create when the user click the button.
NB: I’ve not been able to send multiple attachments yet, so for now I just send the first or last item or the collection. The error when the attachment table contains multiple items: The managed blob uri is not owned by the current app’s BlobManager
Not yet figured it out…
OnSelect:
//Create a new Table
ClearCollect(FinalAttachments; {Name:Last(colAttachments).DisplayName; ContentBytes:Last(colAttachments).Value;’@odata.type’:””});;
// Send the email
Office365.SendEmail(“me@me.com”; “My Subject”; “My Body”; {Attachments:FinalAttachments})
That’s it, when the user click the button, it will create a new Collection with the 3 specific columns required for the Attachment and send it.
According to Microsoft, getting incremental changes for Azure AD groups is done using Delta Queries of the Microsoft Graph API.
I wanted to build a solution that could get incremental changes for a group, process the result and save a “state” to get only the new changes the next time. I also wanted to build a generic solution to be able to monitor multiple groups at once and build it serverless. So I came with this implementation:
Delta Queries Graph API with Azure Functions
First Function: Timer Trigger
The first function is used to schedule the mechanism, so for this implementation I used a Timer Trigger Function written with PowerShell.
The code of this function is very simple and is just a HTTP Request to the second function. The advantage of this is that it can make multiple Http calls to the second function to trigger the delta query mechanism on multiple groups at the same time
$groupId = "[ID of the group to monitor]"
$queueName = "[Name of the queue to send the results to]"
$url = "[Url of the second Azure Function]&groupid={0}&queuename={1}" -f $groupId,$queueName
Invoke-RestMethod -method Get -uri $url -headers @{"content-type"="application/json"}
Second Function: Http Trigger
The second function is the one making the delta query call for the Azure AD Group ID passed as a parameter then sends the results to the queue which name is also passed as a parameter.
According to the documentation, the delta query returns the results of the changes that appears in the group as well as the next query that should be called the next time. So in order to get incremental changes, we have to save the next query string somewhere so that the next call would contains only the new changes done to the group. (Add member, remove member, change name…).
As an Azure function uses the File Storage system of the storage account linked to it, I chose to save this value (the next query) in a file. The content of this file being replaced each time with the next query to call. Another place could have been a Table, or a blob, but I wanted to keep it simple and in the same place as the function.
The code of this function looks like that:
$baseQuery = "https://graph.microsoft.com/beta/groups/delta?&filter=id eq '{0}'&`$expand=Members"

# get the parameters from the Http Request
if($req_query_queuename){
    $queueName = $req_query_queuename
}
else{
    $queueName = ""
}

if($req_query_groupid){
    $groupid = $req_query_groupid

    #Try to load local file with DeltaLink
    $filePath = "$PSScriptRoot\deltaLink_{0}.json" -f $groupid

    if(Test-Path $filePath){
        $deltaLinkFile = Get-Content $filePath -Raw -Encoding UTF8 | ConvertFrom-Json

        if($deltaLinkFile.NextDeltaLink){
            $query = $deltaLinkFile.NextDeltaLink
        }
    }
    else{
        $query = $baseQuery -f $groupid
    }
}
else{
    $query = $null
}

write-output "Query = $query"
if ($query -and $queueName -ne "")
{
    $tenantId = $env:TENANTID
    $clientId = $env:APPCLIENTID
    $clientSecret = $env:APPCLIENTSECRET
    $resourceUrl = "https://graph.microsoft.com"

    # function to get an access token from Azure AD (not explained in this article: see https://docs.microsoft.com/en-us/graph/auth-v2-service#4-get-an-access-token)
    $accessToken = Get-GraphAccessToken -AppID $clientId -AppSecret $clientSecret -TokenAuthURI "https://login.microsoftonline.com/$tenantId/oauth2/token"

    $nextDeltaLink = ""
    $result = @()
    if($accessToken){
        # send the request (function explained below)
        $resultQuery = Send-GraphApiRequest -Uri $query -accessToken $accessToken -method Get
        $result = $resultQuery.Results
        $nextDeltaLink = $resultQuery.NextDeltaLink
    }

    Write-Output $resultQuery

    if($nextDeltaLink){
        Write-Output "Saving NextDeltaLink"
        $dataToExport = new-Object -typeName psobject -property @{"NextDeltaLink" = $nextDeltaLink}
        # Save the next delta link to a file inside the function app
        Convertto-json $dataToExport | out-file $filePath -Encoding UTF8
    }

     # Send the result to the output (Here the response from the Http Request) (Optional)
    Out-File -Encoding Utf8 -FilePath $res -inputObject $result

    # send the result to the queue passed in parameter
    if($result){
        $resultObj = convertfrom-json $result

        if($resultObj){

            if($resultObj."members@delta"){
                $StorageCtx = New-AzureStorageContext -ConnectionString $env:AzureWebJobsStorage
                $outQueue = Get-AzureStorageQueue –Name $queueName -Context $StorageCtx
                $msg = Convertto-Json ($resultObj."members@delta")
                Write-Output "Add $msg to Queue $queueName"
                $queueMessage = New-Object -TypeName Microsoft.WindowsAzure.Storage.Queue.CloudQueueMessage -ArgumentList $msg
                $outQueue.CloudQueue.AddMessage($queueMessage)
            }
        }
    }
}
else{
    $message = "Please provide a value for the arguments 'groupid'.
    Write-Output $message
    Out-File -Encoding Utf8 -FilePath $res -inputObject $message
}
Below is a function helper to send an Http Request to Microsoft Graph API and process the results
The last function will not be explained here because it’s not part of the “generic” process and is only used to process the results according to your requirements (Assign licences, Change Policies, Update DataBase, Update User Profiles…)
This article will explain how to create a multilingual Power Apps based on a JSON language file stored in SharePoint. The solution provided here is one of many available solution that can be built to implement multilingual Apps.
Here’s the final rendering:
Final Rendering
Step 1 – The Power App
For this example I will use a very simple PowerApp with only a couple of controls but it can be extended to many labels on many screens 🙂
So here’s what my app looks like:
Multilingual App
It contains a couple of controls and a dropdown list to select the language the user wants to display.
Perform Step 2 and 3 and then come back here for the formulas used in the PowerApp
The formulas used to process the language file are pretty simple and looks like:
OnStart function to process the language file
Details of the formulas:
1) Save the profile of the current user in a global variable. Set(MyProfile,Office365Users.MyProfileV2())
2) Run the flow created in Step 3 and save the result in a global variable Set(LanguagePack,’Dev-GetLanguagePack’.Run());
3) Set a global variable with the current language based on the user settings or the default language found in the language file
In this case I wanted the file to be editable by another team so I chose to store it in a document library. (Everyone that’s using the App should have at least read access on this file)
Here’s what the file looks like. It’s an example and as it’s JSON you can create your own model. For this example I wanted to keep it simple with 2 languages and a couple of labels on 1 screen.
Language file
Step 3 – The Flow to link the file to the App
In order for PowerApp to process a JSON string, it must comes from the response of a flow using the Response Action which must contain the schema of the JSON (otherwise you’ll get a boolean response).
The flow in itself is pretty simple and looks like that:
In a previous article, I wrote about how to get the changes done for an Azure AD Groups using delta queries and scheduled calls to a specific url. While I was writing it I found the subscription section in the documentation and It could also help to achieve the same goal.
The process is slightly different than with the delta queries. In this case we have to create a notification subscription on a specific resource in Azure. In our case a specific group by specifying the group ID.
Once the notification is created, a webhook receives the notification message when a change appears in the group with the necessary information (User Added, User Removed…)
A limitation exists though is that the subscription is only valid for a certain amount of time (~3 days). As a workaround, I created a specific Azure Functions used to automatically check and renew the subscription before it expires, so the process never stops working.
Here’s what the process looks like
Notification using azure functions
The Create/Renew subscription Azure function
The first function is a timer triggered azure function that runs every xx minutes (your choice. 30 in my case) to check if there is a subscription to renew or to create based on a configuration file. Here’s the code of the function
$FunctionDirectory = Get-Item $EXECUTION_CONTEXT_FUNCTIONDIRECTORY
$AssetsDirectory = $FunctionDirectory.Parent.GetDirectories("_")

# Load config file locally
Write-Output " - Load config file localy"
$configFilePath = Join-Path -Path  $AssetsDirectory.FullName -ChildPath "appconfig.json"
$appConfig = Get-Content -Raw  $configFilePath | ConvertFrom-Json

if($appConfig){

    # GET method: each querystring parameter is its own variable
    $query = "https://graph.microsoft.com/v1.0/subscriptions"
    $tenantId = $env:TENANTID
    $clientId = $env:APPCLIENTID
    $clientSecret = $env:APPCLIENTSECRET

	#Get an access token from MS Graph using an AppID/AppSecret that have Group.Read.All permissions
    $accessToken = Get-GraphAccessToken -AppID $clientId -AppSecret $clientSecret -TokenAuthURI "https://login.microsoftonline.com/$tenantId/oauth2/token"

    $result = @()
    if($accessToken){
		# Get all the existing subscriptions created by this AppId
        $resultQuery = Send-GraphApiRequest -Uri $query -accessToken $accessToken -method Get
        $result = $resultQuery.Results | convertfrom-json
    }

    $Enabledsubscriptions = $appConfig.NotificationGroupsConfig | Where-Object {$_.Enabled -eq $true}
    $Disabledsubscriptions = $appConfig.NotificationGroupsConfig | Where-Object {$_.Enabled -eq $false}

    Write-Output $resultQuery

    if($null -ne $result){
        # Check existing subscription to renew = update expirationDateTime
        $existingSubscriptionsToRenew = [array]($result | where-object {$_.resource.replace("Groups/","") -in $Enabledsubscriptions.SourceGroupId})
        Write-Output "Checking $($existingSubscriptionsToRenew.count) existing subscriptions to renew"
        $currentDate = Get-Date
        $expirationDateTime = ((get-date).AddMinutes(4230)).ToString("yyyy-MM-ddTHH:mm:ssZ")
        $headers = @{
            "Content-Type" = "application/json"
            "Authorization" = "Bearer $accessToken"
        }
        foreach($sub in $existingSubscriptionsToRenew){
            $subExpirationDate = ([DateTime]$sub.expirationDateTime).AddHours(-5)
            if($currentDate -gt $subExpirationDate){

                try{
                    Write-Output "- Updating subscription: $($sub.id)"
                    #update subscription
                    $param = @{
                        "expirationDateTime"= "$expirationDateTime"
                    }
                    $body = new-object -typeName psobject -property $param
                    $bodyJson = Convertto-json $body
                    $uri = "$query/{0}" -f $sub.id

                    Invoke-RestMethod -method PATCH -uri $uri -headers $headers -body $bodyJson
                }
                catch{
                    Write-Output "Unable to update subscription: $($sub.id)"
                    Write-Output "$($_.Exception.Message)"
                }
            }
            else{
                Write-Output " - Subscription with Id $($sub.id) does not need an update"
            }
        }

        # Creating new subscriptions
        if($result.count -gt 0){
            $subscriptionToCreate = [array]($Enabledsubscriptions | where-object {$_.SourceGroupId -notin $result.resource.replace("Groups/", "")})
        }
        else{
            $subscriptionToCreate = [array]($Enabledsubscriptions)
        }

        Write-Output "Creating $($subscriptionToCreate.count) new subscriptions"
        $currentDate = Get-Date
        $expirationDateTime = ((get-date).AddMinutes(4230)).ToString("yyyy-MM-ddTHH:mm:ssZ")
        $headers = @{
            "Content-Type" = "application/json"
            "Authorization" = "Bearer $accessToken"
        }
        foreach($newsub in $subscriptionToCreate){
            try{
                $subscriptionObj = [ordered]@{
                    "changeType"= "updated"
                    "notificationUrl"= "$($newsub.notificationUrl)"
                    "resource"= "Groups/$($newsub.SourceGroupId)"
                    "expirationDateTime"= "$expirationDateTime"
                }

                $body = new-object -typeName psobject -property $subscriptionObj
                $bodyJson = Convertto-Json $body
                Write-Output $bodyJson

                Invoke-RestMethod -method POST -uri $query -headers $headers -body $bodyJson
            }
            catch{
                Write-Output "Unable to create subscription for group: $($newsub.SourceGroupId)"
                Write-Output "$($_.Exception.Message)"
            }
        }

        # Delete existing subscriptions based on parameter file
        $existingSubscriptionsToDelete = [array]($result | where-object {$_.resource.replace("Groups/","") -in $Disabledsubscriptions.SourceGroupId})
        Write-Output "Deleting $($existingSubscriptionsToDelete.count) existing subscriptions"
        foreach($subtoDelete in $existingSubscriptionsToDelete){
            try{
                Write-Output "- Deleting subscription: $($subtoDelete.id) on resource $($subtoDelete.resource)"

                $uri = "$query/{0}" -f $subtoDelete.id
                Invoke-RestMethod -method DELETE -uri $uri -headers $headers
            }
            catch{
                Write-Output "Unable to delete subscription $($subtoDelete.id) on resource $($subtoDelete.resource)"
                Write-Output "$($_.Exception.Message)"
            }
        }
    }
}
else{
    Write-Output "The configuration file is null check the parameters: ConfigFilePath=$configFilePath"
}
The configuration file
The configuration file is a JSON that contains every information needed to create a subscription on a specific group. As it is JSON you can adapt it to your need.
{
    "NotificationGroupsConfig": [
        {
            "SourceGroupId": "[GUID of the first group]",
            "NotificationUrl": "https://myfunctionapp.azurewebsites.net/api/myfirstwebhook",
            "Enabled": true
        },
        {
            "SourceGroupId": "[GUID of the second group]",
            "NotificationUrl": "https://myfunctionapp.azurewebsites.net/api/anotherwbhook",
            "Enabled": true
        }
	]
}
The webhook that will receive the notification message
The webhook that will receive the notification is an Http Triggered Azure function. It has 2 purposes.
The first one is to assess the subscription by sending back a specific token sent during the subscription process. The second one is to process the messages received when the subscription is live.
# Validation token received when a subscription is created
# this token needs to be sent back with a status code 200 and a content-type plain/text
if ($req_query_validationToken)
{
    $validationToken = $req_query_validationToken
    write-Output "validationToken = $validationToken"
    $message = "{ `"headers`":{`"content-type`":`"text/plain`"}, `"body`":`"$validationToken`", `"statusCode`":`200`}"
    Write-Output $message
    [System.IO.File]::WriteAllText($res,$message)
}
# Message received and processed
else{
    $resourceData = $requestBody.Value[0].ResourceData
    $requestData = $requestBody.Value[0]
    # the changes on the membership of the group
	$membersDelta = $resourceData."members@delta"
    $userIdsremovedFromSourceGroup = [array]($membersDelta | where-object {$_.psobject.properties.name -contains "@removed"} | select-object id)
    $userIdsToAddedToSourceGroup = [array]($membersDelta | where-object {$_.psobject.properties.name -notcontains "@removed"} | select-object id)

    # Add any actions needed on the users (Licensing, permissions, ...)
}
That’s it !! when a user is added to or removed from the group, the webhook will receive a notification of which user has been added/removed. The rest is up to you and can be used for example for: – Migration of specific users to another system – Actions that needs to be taken automatically on specific users – Specific needs of licensing for example that needs an approval process – ….